How to Replace the Battery on a Razor MX350 Dirt Rocket in 4 Easy Steps
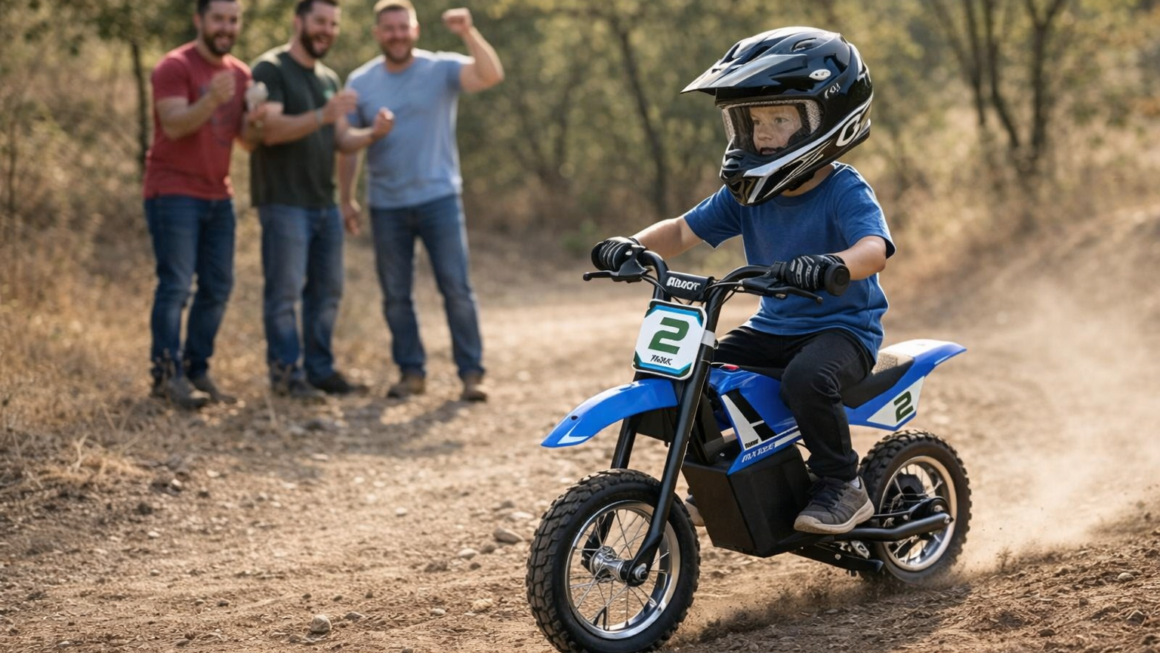
The Razor MX350 Dirt Rocket is one of Razor’s most popular entry-level electric dirt bikes, perfect for kids just starting out. With its approachable size, safe top speed, and motocross-inspired design, it’s often the first “real” dirt bike experience for younger riders.
But like any electric ride, the battery eventually wears out after months or years of use. If your MX350 isn’t holding a charge, runs for only a few minutes, or won’t turn on at all, chances are it’s time for a new battery.
The good news? Replacing the battery on a Razor MX350 is a simple process that most parents can handle at home with just a few tools. In this guide, we’ll walk you through the process step by step, highlight the tools and parts you’ll need, and share tips for extending your new battery’s life.
Need a new battery for your Razor mx350 electric dirt bike? Check the price for a brand new battery below:
Why Replacing the Razor MX350 Battery Matters
The MX350 comes with a 24V battery system (two 12V sealed lead-acid batteries wired together) that powers the 350-watt chain-driven motor. These sealed lead-acid batteries are durable, but over time, they naturally lose capacity.
Typical signs that it’s time to replace your Razor MX350 battery include:
-
Reduced run time (less than 15 minutes of riding)
-
Bike won’t fully charge or doesn’t hold a charge
-
MX350 doesn’t turn on at all
-
Noticeable battery bulging or corrosion
By installing a new battery pack, you’ll restore the bike’s performance and give your rider the full 30–40 minutes of ride time the MX350 was designed for.
If you’re still considering which bike is right for your rider, check out our comparison of the Razor mx350 vs the Razor mx650 electric dirt bike.
Tools and Parts You’ll Need
Before diving into the replacement process, make sure you have the following:
-
Replacement battery pack – Compatible with Razor MX350 (24V pack, typically includes two 12V/7Ah or 12V/9Ah SLA batteries). You can find OEM or aftermarket options online.
-
Phillips screwdriver – For removing screws on the battery cover and frame.
-
Allen wrench set – For loosening certain bolts (depending on model year).
-
Needle-nose pliers – Helpful for safely removing and reattaching connectors.
-
Zip ties or electrical tape – To secure wires neatly once reinstalled.
⚡ Pro Tip: Always double-check that your replacement pack is specifically labeled for the Razor MX350 Dirt Rocket to ensure compatibility.
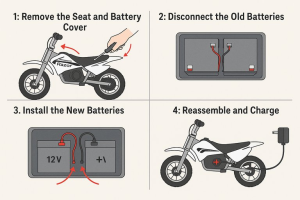
How to Replace the Battery on a Razor MX350 – Step by Step
Replacing the battery takes about 20–30 minutes. Here’s the process:
Step 1: Remove the Seat and Battery Cover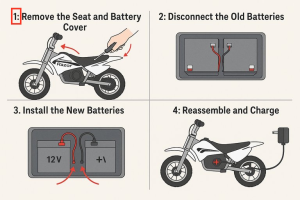
-
Make sure the MX350 is powered off and unplugged from the charger.
-
Use a Phillips screwdriver to remove the screws securing the seat and battery cover (located directly beneath the seat).
-
Lift the seat and cover to expose the battery compartment.
This will give you access to the two sealed lead-acid batteries that power the bike.
Step 2: Disconnect the Old Batteries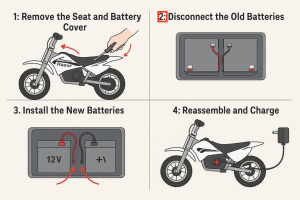
-
Carefully disconnect the wiring harness connectors from each battery. These connectors may feel snug — use pliers if needed, but avoid pulling on the wires themselves.
-
Note how the wires are arranged, or take a picture with your phone. This will make reconnecting the new pack much easier.
-
Remove the old batteries from the compartment. Be cautious — while small, they are still heavy compared to their size.
Step 3: Install the New Batteries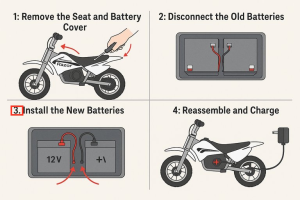
-
Place the new 24V battery pack into the compartment in the same orientation as the old one.
-
Reconnect the wiring harness exactly as it was before. Red goes to positive (+), black to negative (–).
-
Ensure all connections are tight and secure. Loose connections can cause performance issues or prevent the bike from powering on.
Use zip ties or electrical tape to neatly bundle wires and keep them from rubbing against moving parts.
Step 4: Reassemble the MX350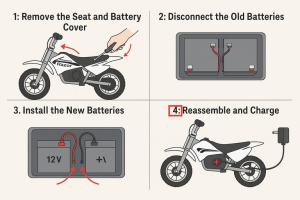
-
Replace the battery cover and secure it with the original screws.
-
Reattach the seat and tighten all bolts.
-
Plug in the bike’s charger and let the new battery charge for a full 12 hours before the first ride. This ensures maximum capacity right from the start.
Once charged, your MX350 is ready to ride again — with the full performance your rider remembers.
Extending the Life of Your New MX350 Battery
Getting a fresh battery installed is only half the battle. To keep it running strong, follow these tips:
-
Charge after every ride. Don’t leave the battery drained for long periods.
-
Avoid overcharging. Unplug once it’s fully charged (usually after 12 hours).
-
Store indoors. Keep the bike in a dry place away from extreme heat or cold.
-
Use the correct charger. Only use the Razor-approved charger that came with your MX350.
-
Ride regularly. Batteries last longer when they’re used consistently.
With proper care, a new battery should give you 1–2 years of reliable performance.
Here’s a video on how to replace the battery:
Common Questions About Razor MX350 Battery Replacement
Can I upgrade the MX350 battery for more run time?
Yes, some riders install higher-capacity 12V/9Ah batteries instead of the stock 12V/7Ah. This can extend ride time but may add extra weight.
How long does it take to replace the battery?
About 20–30 minutes for most people with basic tools.
Do I need to replace both batteries?
Yes. Since the MX350 uses two batteries wired together, both should be replaced at the same time for balanced performance.
Can my old charger work with a new battery pack?
Yes, as long as you’re installing a compatible 24V pack, your Razor charger will still work.
Razor MX350 Battery Replacement vs Buying a New Bike
If your MX350 is otherwise in good shape, replacing the battery is a cost-effective solution that can extend the life of the bike by years. However, if your rider has outgrown the MX350, it may be worth upgrading to a larger model like the Razor mx 650 or the Razor mx500 electric dirt mike models, both of which offer more power and higher weight limits.
The Razor MX350 Dirt Rocket is a fantastic entry-level electric dirt bike for kids, and a simple battery replacement can bring it back to life when performance starts to fade. With just a few tools and about half an hour, you can swap in a fresh 24V pack and get your rider back on the trails.
By following proper maintenance and charging practices, you’ll maximize your investment and keep the fun going for years. And when your young rider is ready to upgrade, Razor has an entire lineup of bikes to match their growing skills.
For more detailed guides, comparisons, and reviews, check out our full Razor Electric Dirt Bike Buyer’s Guide and our review of the Razor SX350 Jeremy McGrath Dirt Bike.